June 2013
  

June 2013 Sharing Time & Week in Review

Welcome to June's Sharing Time Linky & a review of this week's posts:
---------------------

Don't miss your chance to enter the Shabby Apple Giveaway I posted this week!


I also posted my experience this week & my thoughts on Parenting Moments that Matter.


And a "Monday Moment" :)


And since Google Reader is on its last couple of days, let me re-share my post about Bloglovin'


Now, on to the link party- can't wait to see the new ideas you'll add!


You can Follow my blog with Bloglovin

Thoughts: Parenting Moments That Matter

I can look back on my growing up years and clearly remember certain moments that made an impact on me. Moments when a parent made a choice to do something unexpected or unusual. Moments that showed me that I was important to them, that I mattered more than a lot of other things, to them.
I hope to create moments like these for my girls as well.


This week I had an opportunity to do that, and I'm so happy that I took it!


Wednesday was the second to last day of school. Ken had been gone overnight on Tuesday and called me from his lab about rearranging our schedule for that day. I spent longer on the phone with him than I realized, then went to eat breakfast with the girls. I looked up at the clock and realized that we had 3 minutes until we needed to leave for Talia's bus. Since I usually don't have a car, if she misses the bus, she misses school. So we went into speed mode and tried to get her ready so she wouldn't miss school.

I went crazy getting her lunch ready, she ran upstairs & got ready fast, I whipped Katrina’s clothes on her, whipped my clothes on, signed the report card, shoved everything in Talia’s backpack, realized she needed her hair done, so as we’re walk/running to the bus, I’m trying to pull the tiny elastic out of her hair from yesterday (which unfortunately hurt her) and brush her hair (now she’s semi-in tears & I’m apologizing profusely as we stand by the park & watch the bus pull up).

I feel terrible that she's so sad, we start running but Katrina’s not caught up. As we near the road, I call to Katrina, ask her to wait at the sidewalk and I run, holding Talia’s hand, to the bus. (Meanwhile another mom tells the bus driver we're coming & he waits). As we run, Talia sadly says she doesn’t want to go today but I feel like she will be sad if she doesn't go & it’ll be too late if she doesn’t get on that bus- so I encourage her, try to cheer her up, give her a kiss & she gets on the bus. I stand by her window blowing kisses & saying I love you with sign language, waving profusely at her sad face as she does the same.

I felt SO BAD!!! Then I ran back to Katrina who was standing sadly at the edge of the road, on the sidewalk, and sadly told me she didn’t get to say goodbye to Talia. I picked her up & comforted her during the walk through the park (not just because she didn't get to say goodbye to Talia, but because I feel bad that I left her on the sidewalk alone while I ran away with Talia!).

I set her down to walk and as we round the corner back to our house it hits me- We HAD THE CAR ALL ALONG! I totally could have gotten her ready at a good pace, had a family prayer, even read scriptures, had her happy & ready for school, and then driven her to school! I am so sad this didn’t occur to me earlier! I was thinking that if she missed the bus she would miss the day & there was nothing I could do about it.

So, I called my mom (to debrief haha ;) and made a plan to make it all better. I called the school to tell them I would be picking Talia up that morning for an "appointment". I picked her up, we drove to Wendy's and had a Frosty together while we talked, I apologized for the crazy morning, and then we took her back to school happy.


Talia & I (Photo by Verity Doktor Photography)

I'm sometimes intimidated by the school... I have to put it into perspective and remind myself that I'm her mother and if I want to take her out for an hour, it's okay! I think I'll get over this in time, but for now I'm still coming to terms with it. Am I the only one who feels or has felt this way?

Anyway, I'm so glad I did it.
It was a fun memory for the 3 of us, and it felt to me like a parenting moment that mattered.
(and let's be honest, the report cards were already in- she wasn't missing anything important!)


The Idea Room

Shabby Apple Giveaway

Let me share a couple of quotes from Shabby Apple's website:

"Each piece is carefully constructed to both flatter a women’s figure and maintain her mystery... With our old-fashioned style and modern ideals, we believe the best is yet to come!"

Don't you love that approach?

I don't generally like to do giveaways for items that I haven't been able to try out myself, but today I'm going out on a limb ;) I think I can trust Shabby Apple after hearing so many others rave about them! I think you're going to be happy to hear that Shabby Apple has offered to give one of my readers something new for her wardrobe :)


Among all of the fabulous options on their website which is full of gorgeous vintage clothing, you'll find the Heart of Me Dress and the Lime Ricki Skirt (shown below). One of these is up for grabs!


One of you will win either the Heart of Me Dress or the Lime Ricki Skirt (your choice).
Just fill out the Rafflecopter form below for your chance to win!
(This giveaway is only open to those with a U.S. mailing address.)

a Rafflecopter giveaway

Monday Moments (Chilly in Chile... get it?!)

To understand this one, you should know that in our religion, young men and young women often serve missions. They get called to go to another part of the world for 18months to 2 years, to teach people about the gospel. Recently, our very close friend and babysitter (who is basically like an aunt to our girls) received her mission call.


[Amber & Katrina]

Me: *pulls out a baking sheet*
Katrina: What are you making, Mom?
Me: *pulls out bag of frozen cookie dough balls from freezer*
Katrina: "Oh, cookies?!"
Me: "Yep. It seemed like a good day for it since it's a chilly day, so it won't feel too hot to turn the oven on."
Katrina: "Amber's going to have tons of cookies!"
*smiling, and laughing a lot*
"...Do you know why I said that? Cuz she's going on her mission and it's called Chile!" :)

She said this with such a huge, cute, proud smile :)

A Beginner's Guide to Talmage


James E. Talmage is a very well known author in my religious community. He has written books that have become gospel classics (including Jesus the Christ and The Articles of Faith). He had a gift for explaining himself well in writing, with accuracy and insight.

A new book called A Beginner's Guide to Talmage by Calvin R. Stephens has been published by Deseret Book. I've had a chance to look through a copy of it, and I think it's great!

Calvin writes about Talmage in the beginning of the book, in a small "life sketch" section, and shares excerpts from many of his writings, organized into subject matter. Whether you have been wanting to read Talmage's writings but haven't felt prepared to tackle it all, or you want an easy way to find that quote that you read once in one of his books, this will be a great resource!

I like that you can study by topic, and everything is clearly referenced, so that you can refer back to the original work if you want to read more. It's interesting to read through it, bringing different themes to mind- a great way to start off on thematic doctrinal study.


A Beginner's Guide to Talmage is available to purchase on Deseret Book's website
as a paperback book or as an ebook.

Disclosure: I received a copy of this book for review purposes from Deseret Book. All opinions expressed here are my very own.

DIY Lace Crown Tutorial

Isn't this little lace crown adorable?


How to make a Crown from Lace by www.RaisingMemories.com

I had seen these floating around Pinterest a few times and knew that I needed to try them!
I took some photos throughout the process so that I could share them with you in tutorial form:

Materials Needed

Lace
Fabric Stiffener
Metallic Paint (unless your lace is metallic already)
Wax Paper
Tape
Container about the shape you want your crown to form in (I used a vase)
Hot Glue

How To Make Your Crown

How to make a DIY Photography Prop Crown from Lace

1. Start by wrapping wax paper around your container (tape in place)
(protects your container from the fabric stiffener and makes it easy to get your crown off later).

Decide how big around you want your crown
(I just held some lace up to my daughter's head to get an idea).
Cut the lace (so that ends will meet nicely)

2. Cover your lace in fabric stiffener
(you can dip it in the stiffener & then wipe the excess off with your fingers)

3. Wrap the lace around your container

4. Hot Glue the ends of the lace together.
Leave it there to dry.

5. If you don't already have gold or silver lace, you can paint it when you're finished. (I used gold lace that I found on my new sponsor's website, wholeport.com). I also got some white lace from the website & plan to use some silver paint on it.


These will make great photo props- I'm excited to use them! And I'm sure we'll use some for dress-up around here as well ;) Here's Katrina, modeling the first one that I made:


DIY Lace Crown Tutorial

Note: I know that you can also use mod podge to make these (instead of fabric stiffener). I tried that first, and did end up with a stiff enough crown to use as a prop for photos, but it didn't last long- it was pretty flimsy. Then I bought the fabric stiffener to try & it definitely worked out better, so I would recommend this method over the mod podge one, from my experience! If you don't have stiffener and want to give the mod podge a try, here is a beautifully photographed tutorial.
----------------------------------
Other Great Princess Crafts:

How to Make a Wand

Fairy Princess Tea Party Birthday Party


Disclosure: Any products from Wholeport.com's website were provided to me free of charge. Any opinions shared about their website or products are my own!

Grammar Perspective (Monday Moments)


Katrina: She choosed red.
Me: Chose.
Katrina: She chosed red.

Happy Father's Day

Happy Father's Day!


Thursday Thoughts - Unique & Wonderful ( and a Contest! #KINDERMom )

Isn't it amazing how different our kids can be from each other? Not just in appearance, but just in who they are. It's a constant reassurance that our kids come to us as their own selves- it's not all nurture, if you ask me, it's definitely a balance between nature & nurture!

In thinking about what makes my kids unique, I started looking through old pictures and comparing how they looked at different ages. Talia was born with hair, Katrina was born with fuzz. Talia's hair was already long by her first birthday, but Katrina couldn't do pigtails until her 2nd. Talia's hair was long enough to donate when she was 3 & Katrina's had barely changed in the year between her 2nd & 3rd birthdays! :) Aside from that funny little difference, it's just interesting to look at their faces at the same ages!


They each have several things that make them unique- one has a special talent in the arts, the other has an amazing memory, and the list goes on! They are both so precious to me and I love them each so much!

---------------

Did you know there are new Kinder® Surprise® Pink toys? My kids are loving the flower rings and the bracelets (with stickers to decorate them). You can check out a gallery of the new toys here.


To celebrate the launch of Kinder® Surprise® Pink, Kinder Canada will hosting an exclusive Facebook contest. You can participate by becoming a friend of Kinder Canada on Facebook and telling them what makes your child so unique! You could be lucky enough to scoop up one of three $250 VISA gift cards! Contest will be live from until June 19.

Disclosure: I’m part of the KINDER® Mom program and I receive special perks as part of my affiliation with this group. The opinions on this blog are my own

4 Great Repurposing Tutorials (and free coupons!)

Over the time I have spent posting over at HowDoesShe, I have shared several "up-cycle"/repurposing ideas. It's so fun to take something old and turn it into something new! Here are a few of the fun repurposing things I've shared:

Turn a Broken Umbrella into a Parachute!
We just pulled this play parachute out for Victoria Day when we met at a park with a bunch of cousins and family. It was a hit! To see my tutorial on how to make one, click here.


Turn a Woman's Tank Top into a Girl's Skirt!
For a tutorial on how I did this, click on over here.


Turn a Trampoline into a Greenhouse!
This idea and project was my mother-in-law's and you can find details in my post over here.


Make a Memory Quilt from Old Clothes!
I love this quilt I made out of well-loved clothes that my children or I had grown out of or worn out. For details on how I made mine without buying any new materials, click here.


Now, while we're on the subject of taking old things (that are good) and making them into really great new things...

Let me tell you about the brand-new Honey Nut Cheerios Hearty Oat Crunch cereal! :)
This new cereal is celebrating the classic Honey Nut Cheerios you know and love, and mixing it up with crispy oat flakes and delicious nut clusters.

My girls love Honey Nut Cheerios, and as expected, the new Honey Nut Cheerios Hearty Oat Crunch has been added to their list of favourite cereals (we are totally cereal people at our house).

Also, guess what! If you have your own "up-cycle" tip, you can share it for a chance to get a box of the new cereal for free! You can do this immediately (on my blog, below) or through a coupon on www.facebook.com/LifeMadeDelicious


[Contest is now Closed]


Disclosure – I am participating in the Honey Nut Cheerios Hearty Oat Crunch Blogger Campaign by Mom Central Canada on behalf of General Mills, and received compensation as a thank you for participating and for sharing my honest opinion. The opinions on this blog are my own

China (Monday Moments)


Our Silly Girl


Ken: You know there are some parts of the world where children are not allowed to have naps...
Talia: Really?
Ken: No, I don't think so. I'm just kidding but some kids have to go to work.
Me: We're lucky we live in this country. There are lots of things we have here that you can't have or do in some other parts of the world.
Katrina: I'm glad I don't live in China
Ken & I: *laughing* (and wondering what she has against China)
Ken: Who told you about China?
Katrina: Nobody- I just noticed it by myself

5 Cute Sewing Projects (Featuring YOU!)

There were some really cute projects linked up this month that involved fabric, so I wanted to feature some of them. Check these cute things out & visit the blogs for more details! :)

Road Trip Pillowcase by I Dig Pinterest and I Did it Too


E-Reader Cover by Blissful Sewing


Ruffle Curtains by Crafting in the Rain


Reupholstered Chair by The Pink Lab


Easy Peasy Summer Skirt (with Free Pattern!) by Blissful Sewing


Thanks to everyone who continues to link up to Sharing Time, I love to see what you're up to!

If you were featured today, feel free to grab the featured button from the bottom of my sidebar, and add it to your blog if you'd like :)

Jo Totes Missy in Mint Camera Bag Review

It's time for another camera bag review!
I have already tried out two fabulous camera bags- the Millie by Jo Totes, and the B-Hobo by Kelly Moore.

This time, Jo Totes (also known as Johansen Camera Bags) has sent me the Missy bag in Mint to try out and share with you.
I was not disappointed when it arrived- it's so pretty! :)


Jo Totes Camera Purse Review by www.RaisingMemories.com

Let's get down to the details first, and then I'll tell you what it's been like to use- I waited to post the review until I had been using it for a couple of months, so that I could speak from experience.

As seen in the photo above, the bag comes with 2 handles attached as well as a removable shoulder strap. You can see the clasp for removing the strap in the photo below. To the right of that photo, you can see that the strap is also adjustable in length.

The 2 pockets at the front of the bag are quite roomy and there is a small,
flat zipper pocket at the back of the bag.

Camera Bag Pockets Jo Totes Missy by www.RaisingMemories.com

The removable shoulder strap also comes with a shoulder pad. Seen below is the interior of the bag (without dividers). There are two flat, zipper pockets on the interior of the bag- one at the back and one at the front of the bag. There is also a padded laptop/tablet pocket at the back of the bag, with a Velcro strap to hold it closed.

Missy Bag by Jo Totes

This bag comes with five adjustable, padded dividers. They're all the same size, but three of them have extra Velcro on them, so that you can attach other dividers to them (as well as to the Velcro interior of the bag). This is illustrated in the photo below, on the right.

Jo Totes Camera Bag

I received a tip from another person who had purchased this bag. A similar camera bag company sells a large bag that comes with an extra long divider for the purpose of dividing the bottom of the bag from the top. You can create one of these dividers by attaching two of them as shown below. When the bottom area of your bag is filled with camera gear, place the long divider on top of that section and you create another area for other items on top- this would be great for travelling, or letting the bag double as an overnight bag!

(as you can see from the photo below, there is still quite a bit of room, above the dividers!)

Long Removable Padding for Jo Totes Bag

I also took a few photos of myself wearing the bag. One of the things that had me debating about whether to choose the Missy bag was the size of it. I wanted a larger bag, but I didn't want it to be "ridiculously large", so I searched the internet for photos of people wearing it, to try to make that decision. So, let me make it easier on some of you who may be doing the same thing!

In the left & right photos, I'm using the shoulder strap (you can also wear it cross-body, but I didn't snap a photo of that) and in the middle I'm using the attached handles, like a large purse.
If it helps you, I'm about 5'8". :)

Missy Bags

So, here are my thoughts about the bag:

It is big, but I don't think it's too big. I love all of the smaller pockets that it comes with- they're great for camera accessories (batteries, memory cards, lens cleaner, etc.) as well as my own accessories (lip gloss, keys, sunglasses, etc.) I also love the tablet pocket- even though I don't have my own tablet, or a small enough laptop to fit in it, I use it for papers/notebooks/books. It's great to have a flat spot to put things like that! I also love having all of the dividers. I don't usually use them all at once, because I like to create a large section to store my camera with the lens attached, but it's great to be able to create as many variations as I want! I've also used the bag for things that have nothing to do with photography- about a month ago, I was doing a presentation at a conference and needed to bring a whole bunch of photo books with me- this bag was large enough to fit them all, and I felt like they were safe because of the padding. I've also used it as an overnight bag with camera gear, wallet, and overnight stuff inside.

It really is a great multi-purpose bag, it looks great, and it is wearing really well so far! So, to be honest, I don't have much to say about it that isn't positive! The only thing I can come up with that I don't love about the bag is that the clasp that attaches the shoulder strap to the bag is a little difficult for me to open- I can do it for sure, but it seems to be really strong (and I'm pretty weak ;) It would be really cool if Jo Totes would create a long divider like the one I mentioned earlier in this post, to separate the top from the bottom when desired, but again, you CAN create one on your own with two of the regular dividers :)

So, overall, a truly excellent bag, and I'm really happy with it!

Jo Totes Missy Camera Bag


My review of the Jo Totes Millie Bag.
My review of the Kelly Moore B-Hobo Bag.
My review of the Jo Totes Gracie Bag.
My review of the Jo Totes Abby Bag.
My review of the Jo Totes Siena Bag.

Disclosure: Jo Totes provided this bag to me for review purposes. All opinions in this post are my own- I really do love their products!

Blogging Tips: Goodbye Google Reader, Hello Bloglovin'!

I have been using Google Reader to follow the blogs that I read for years, so I'm pretty sad that they've decided to discontinue it. BUT... after looking into several replacements, I've found a good one that I think I'm going to be happy with!

So, today I thought I'd bring back an old series of blogging tips,
and share it with you & give a little tutorial on using it...

If you are new to RSS Readers, and wondering why you'd want to use one...

RSS Readers are Awesome Because:

1. You don't have to check every blog to see if it updated
(just check the reader- it will tell you which blogs have new posts)
It's like checking your email, but you're looking for blog posts instead of email messages.


2. Do you need a #2? ;)
It's free, it's super easy, and it saves time!

3. You can arrange the blogs you read into categories in folders.


---------------------

So, after doing my research into different RSS Readers, I've settled on Bloglovin'. If you don't want to do the research, let me save you some time. Bloglovin' is simple to use, it's not a huge change from what you're used to if you've been using Google Reader, and if you have been using Google Reader, it's really easy to import your list of blogs that you read on Google Reader, right over to Bloglovin' and you're good to go!

---------------------

Here's how to get onto Bloglovin':

Go to
www.bloglovin.com , and you'll see this:


(click the blue button)

Then you'll see this:


(decide how you want to sign up, and click on that option)

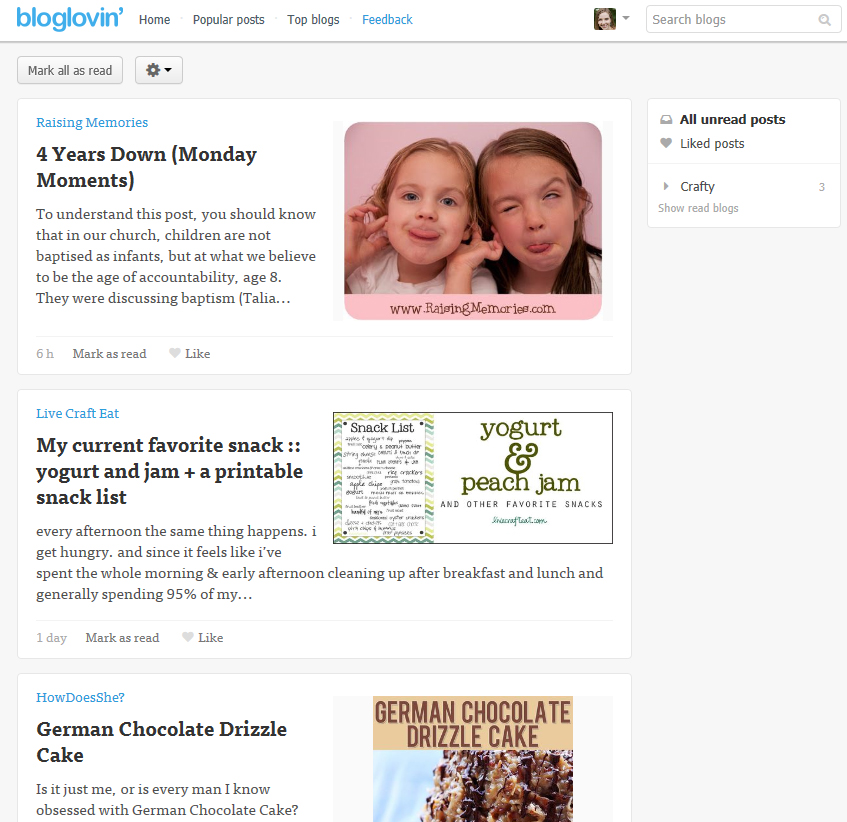
When you've imported the blogs you read (if you are currently using Google Reader), or added the blogs you want to read, you'll see something like this when you go to bloglovin' to check on your blogs (a simple list of unread posts from your favourite blogs- the title, a photo, and a little blurb from the beginning of the post:


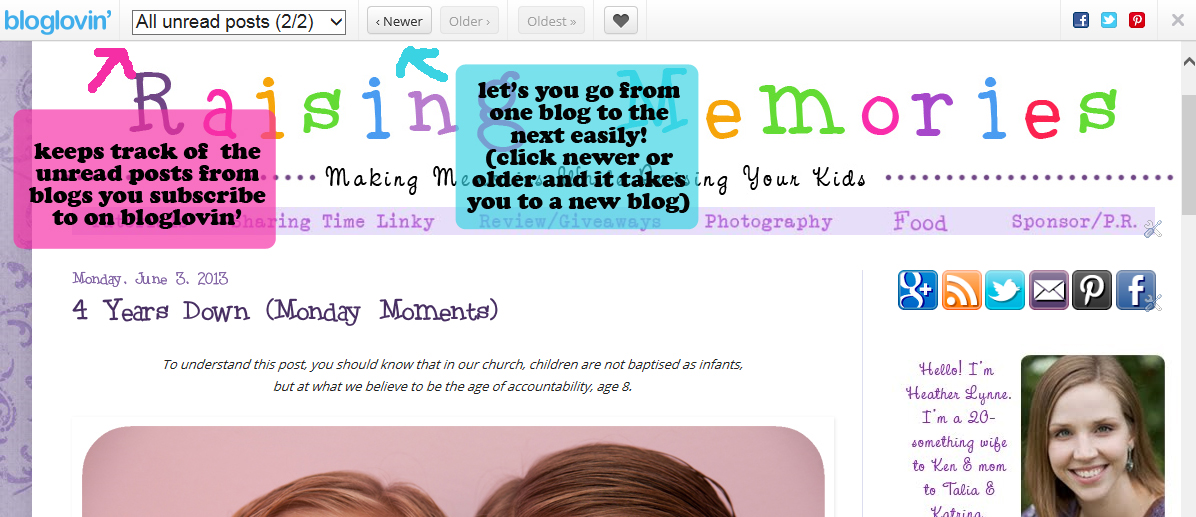
When you click on one of those posts, it takes you right to the blog where you can read the post. You will see a little bar at the top of the screen that says "Bloglovin'" and let's you navigate from one blog to the next, from your list:


I love this setup! (It's still fast, like Google Reader was, but you get to actually see the blog post, AT the blog, and you're right there if you want to leave a comment on the blog.)

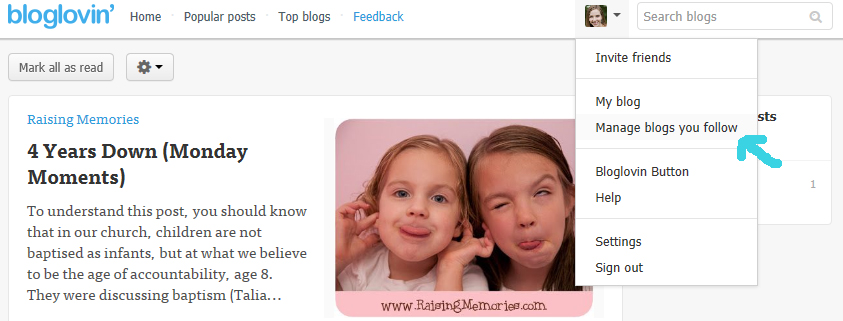
When you want to add a new blog to your bloglovin' list, you click the little dropdown arrow by your picture, then click on "manage blogs you follow"


Then click the blue button at the top that says "Add Blog". (shown in image below)

A search box will pop up where you can enter a URL (like http://www.raisingmemories.com) or the name of the blog you're looking for (like Raising Memories) and any blogs that relate to your search will pop up & you can choose the one you wanted!


You'll also see the "Create New Group" button- that's where you can create a new "folder" or "group" of blogs, by whatever category you like. These can be rearranged at any time.

So, have I convinced you that Bloglovin' is fabulous? ;)
If there's anything that wasn't clear in this post, please feel free to ask questions in the comments- I would be happy to answer them or change this post to make it clearer! :)


4 Years Down (Monday Moments)

To understand this post, you should know that in our church, children are not baptised as infants,
but at what we believe to be the age of accountability, age 8.


They were discussing baptism (Talia is 7 now, so she's looking forward to it. Katrina is 4.)

Talia: You have to wait four years until you can get baptised
Katrina: Nope
Talia: Yeah
Katrina: (very matter-of-fact) No I already waited that long.

Contact Form

Name

Email *

Message *