

From raising kids to empty-nest living, join me in exploring ideas for memory-making and intentional living to create a life you love, through every season of motherhood.
Sincerely,


Raising Memories Facebook Page
Join the new Raising Memories Facebook Page!
It's a great place to find out about current specials and promotions that are going on with Heritage Makers!
Click here to check it out!
More posts coming soon- I've been having computer problems!
I'm on my husband's laptop for tonight, but hopefully my computer will be up & running soon & I can catch up on some posts!
Sidenote: We have a couple of great giveaways coming up, so stay tuned! :)
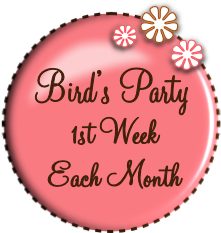
Sharing Time
It's Sharing Time again!
Thanks so much to everyone who participated last week! I think it was a successful first week. I hope to see even more participation this week!
My favourites from last week:
Favourite Kids' Project:
Cindy's Sea Animal Soap

Favourite Makeover:
Kelli's Kitchen Island Makeover

Favourite Sewing Project:
Susan's Floor Cushion

I'm looking for all kinds of projects from sewing to kids' projects, but I'm especially hoping for more kids' projects this week- can't see what you've got, to share!
Thanks so much to everyone who participated last week! I think it was a successful first week. I hope to see even more participation this week!
My favourites from last week:
Favourite Kids' Project:
Cindy's Sea Animal Soap
Favourite Makeover:
Kelli's Kitchen Island Makeover
Favourite Sewing Project:
Susan's Floor Cushion
I'm looking for all kinds of projects from sewing to kids' projects, but I'm especially hoping for more kids' projects this week- can't see what you've got, to share!
Heritage Makers
I'm excited to tell you my news!
I've become a consultant for Heritage Makers!
It's really a cool company and when I started learning more about it, I got more and more excited about it. I have a love for creating and documenting memories. I've been doing that through the things I've shared on this blog, and I've been capturing as many memories as I can with my camera- for my own family and for others. But now I'm excited to add another piece to that!
I love the products from Heritage Makers!
Keep reading if you want to know what you can do with them!

Photo Storybooks
"Photos without stories are just memories forgotten"
Isn't that true? How many times have you looked back on a photo from years before & wondered what was going on?
What I like about Heritage Makers' books compared with the others I have tried:
- they focus on telling stories
- they have tons of scrapbook elements
- they have tons of ready-to-go (yet editable) scrapbook-y templates (so you don't have to spend forever to make it look cool if you don't want to!)
- you don't have to be scrapbook-y if you don't want to either- your books can be simple and classic, too!
- there is complete freedom as far as your layouts go- yay!!

Canvases
That picture is of the canvas I just posted about of ours, so it's not actually from Heritage Makers, but you can get wrapped canvases just like this one and in various sizes, from Heritage Makers- and the prices are excellent! I'm so excited about it & can't wait to choose something to have made into a canvas!

Jewellery!
I'm really excited about this, too! Heritage Makers has bracelets and necklaces with your own photos on them!

Playing Cards
These cards get me so excited because I've been wanting to design a deck of memory cards for a while now, that would be personalized with the pictures of my neices, nephews, and other relatives. We have a lot who live far away so it would be a fun way to remind my girls of their cousins, aunts, and uncles who are far away, and for them to feel less distant!
Also, these are totally customizable so they don't have to be used as a deck of cards- there are so many fun things you could use them for!
More Stuff, Too!
In the interest of keeping this post from taking over your life, I'll just make a list of some of the other cool products offered:
- personalized greeting cards
- postcards
- calendars
- posters
- spiral bound books
- board books
- and more!
Go, check out my Heritage Makers website now! It's awesome & you won't want to miss it!
I've become a consultant for Heritage Makers!
It's really a cool company and when I started learning more about it, I got more and more excited about it. I have a love for creating and documenting memories. I've been doing that through the things I've shared on this blog, and I've been capturing as many memories as I can with my camera- for my own family and for others. But now I'm excited to add another piece to that!
I love the products from Heritage Makers!
Keep reading if you want to know what you can do with them!

"Photos without stories are just memories forgotten"
Isn't that true? How many times have you looked back on a photo from years before & wondered what was going on?
What I like about Heritage Makers' books compared with the others I have tried:
- they focus on telling stories
- they have tons of scrapbook elements
- they have tons of ready-to-go (yet editable) scrapbook-y templates (so you don't have to spend forever to make it look cool if you don't want to!)
- you don't have to be scrapbook-y if you don't want to either- your books can be simple and classic, too!
- there is complete freedom as far as your layouts go- yay!!

That picture is of the canvas I just posted about of ours, so it's not actually from Heritage Makers, but you can get wrapped canvases just like this one and in various sizes, from Heritage Makers- and the prices are excellent! I'm so excited about it & can't wait to choose something to have made into a canvas!

I'm really excited about this, too! Heritage Makers has bracelets and necklaces with your own photos on them!

These cards get me so excited because I've been wanting to design a deck of memory cards for a while now, that would be personalized with the pictures of my neices, nephews, and other relatives. We have a lot who live far away so it would be a fun way to remind my girls of their cousins, aunts, and uncles who are far away, and for them to feel less distant!
Also, these are totally customizable so they don't have to be used as a deck of cards- there are so many fun things you could use them for!
In the interest of keeping this post from taking over your life, I'll just make a list of some of the other cool products offered:
- personalized greeting cards
- postcards
- calendars
- posters
- spiral bound books
- board books
- and more!
Go, check out my Heritage Makers website now! It's awesome & you won't want to miss it!
Our Canvas
You all know I love photography, or ought to know it by now if you've been reading my blog ;) And I love displaying it in my home. What I haven't told you though, is that I have a thing for canvas... check out this fabulous 20x30" canvas that we have hanging in our bedroom, from our session with the amazing Amanda Stratton last year.

Sadly, it is the only canvas I have to display in my home at this time, but hopefully someday, this will change!
While I'm on the subject, check out a great tip from HowDoesShe!

Sadly, it is the only canvas I have to display in my home at this time, but hopefully someday, this will change!
While I'm on the subject, check out a great tip from HowDoesShe!
Monday Moments #17

Yes, this was a funny discovery. No, I did not enjoy having to re-fold all of the clothes from that box!
-------
I went away for a couple of days for a Time Out for Women conference with my mom, right before Mother's Day. It was great!
When I returned home, the first thing Ken said to me was something like this: "If you never make another dinner again, I will not be upset."
And shortly after that, "I appreciate you... But I do not envy you."
Isn't it great when they can see things from your perspective? :)
Sharing Time
So Sharing Time is a new series I've decided to do that will show up here each Sunday. You'll be able to take my Sharing Time button & put it on one (or more) of your own favourite blog posts, and link up to that post here on the Sharing Time post. (It's not hard to do- just give it a try & once you've done it, you'll see how easy it is!)
How to Add Your Link
1. click on the Blue "Add Your Link" button at the bottom of this post
2. Enter the address of the blog post you want to share
3. Enter a name for what you're posting
4. Enter your email (won't be visible or shared)
5. Click on "Next Step"
6. A bunch of your photos will appear- choose the one you want to show up for the post you're sharing, & you're done!
I've added a couple of good links so you can see what it looks like :)
You'll also be able to check back here throughout the week and see what others have posted. The bonus is that you'll be seeing the best of everyone's week- the post they deem worth sharing. And others will be able to come & check out your best posts as well.
The Sharing Time link post will be open to add links to, throughout the whole week and then it will close in time for the next week's Sharing Time post.
I'm thinking I'll probably feature my favourite link from the previous week on the next week's Sharing Time post as well. So, add your link & maybe you'll be featured next week! I'm excited to get sharing with everyone! :)
Mug Flower Pot Gift

For Mother's Day, Ken had the idea to have our girls make personalized mugs for our moms, and fill them with paper flowers with notes on them. They turned out really cute, though I would do some things differently next time!

Tips
- we bought a kit from Michael's that was do-it-yourself, but the photo part peeled off and the markers rubbed off- not cool! Next time, I would get the mug printed somehow so that it would last!
- Ken used regular artificial flower squishy stuff that you stuff stems into (yes, that's the correct terminology) and that worked fine
- green straws are great if you can find them
- you can do paper hand flowers, trace & cut out hands for flowers, hearts as well
- we wrote notes on them from Talia, she drew pictures, and kissed them with lipstick
- spraying the flowers with perfume is a big hit with Talia :)
KidKraft Sling Bookshelf (CSN Stores Review)
I have wanted to have a bookshelf like this for some of our childrens' books for a long time. So, when I was shopping online at CSN Stores & found it, I was psyched that they wanted to send it to me and have me do a review for them!

When we received our KidKraft Pastel Sling Bookshelf, we were so excited! :) It came a lot (more than a week) sooner than we were expecting which was great!

We've had it set up for a while now, and we've found it to be great quality & such a fun tool for our family. I loved my CSN shopping experience as well because:
-they have major selection
(there are so many great products available through them!)
-their prices were really good
(this is definitely an important factor for me)
-and their customer service was excellent.
(I had a couple of questions during the process and I received very quick and helpful responses.)

We love our bookshelf- it keeps our books organized, accessible and visible to the girls. I also like that it's cute :) I'll be able to use it in different areas of our home- right now it's in our living room, but it will look great in our play area or in one of the girls' bedrooms. (And it's lightweight, so it'll be easy for me to transport! :)
I definitely recommend CSN Stores but I warn you- once you start checking them out, you may have a hard time tearing yourself away! ;)
This was not a paid post- the opinions shared are my own. Thank you to CSN Stores who supplied this product for the review.
New Series (Sharing Time)
I started the Raising Memories blog to share ideas and projects that I & my kids have tried. But there are so many great ideas out there & I/we can't try them all fast enough to share them all with you!
So I'm starting a Sunday Sharing Time on the blog & I hope you'll take the opportunity to add a link to your latest & greatest blog posts!

So be ready with one of your favourite projects to share on Sunday!
Be sure to check out the other links to find some great projects from other blogs, too!
(If you're confused about what this means, check back on Sunday & hopefully it will all become clearer ;)
So I'm starting a Sunday Sharing Time on the blog & I hope you'll take the opportunity to add a link to your latest & greatest blog posts!
So be ready with one of your favourite projects to share on Sunday!
Be sure to check out the other links to find some great projects from other blogs, too!
(If you're confused about what this means, check back on Sunday & hopefully it will all become clearer ;)
Cover a Hairband with Fabric
After making the "shirt dress" for Talia, I wanted to use some of the leftover fabric from the shirt, to make a matching hairthing for her.
I bought a hairband at the dollarstore, got out the gluegun, scissors, and sme ribbon and went to work for less than 5 minutes to get this:

~This post has been shared with others at a link party~.
I bought a hairband at the dollarstore, got out the gluegun, scissors, and sme ribbon and went to work for less than 5 minutes to get this:

How To Make a Diaper Cake
Ever wondered how to make your own diaper cake? Well, you're in luck! I'm gonna walk you through it today! :) This is the diaper cake I made for my Sister In Law's baby shower. The cool thing about diaper cakes when you're a mom is that you can re-gift items that you didn't use with your baby. (Diapers that your baby has grown out of before you used them, & little accessories or toiletries that you didn't get around to using or just got too many of). How-To
 How-To
1. Roll a ton of diapers and tie them closed with ribbon (or yarn or elastic bands... get creative ;)
(can you find the diaper that Talia rolled?)
 2. Get a bunch of bowls to use for drawing circles on cardboard
3. Cut out the cardboard circles
 4. Position diapers on the base & wrap some tissue paper or fat ribbon around the outside of the layer (to keep everything together & make it look pretty)
5. Add the next size up of the cardboard bases & repeat until you have the height you want.
6. Put something cute on top & a bunch of little things around on each layer 7. Wrap with cellophane wrap & tie with ribbons & a little tag & you're done!
Monday Moments #16
My mom & sister slept over a few days ago while Ken was out of town.
In the morning, my sister, Amber, said:
I don't feel like showering, but I don't want to look like a gremlin.
Then Talia asked what a gremlin was.
Amber: It's kind of a creepy little guy...
It's not that creepy- it's about this tall, it's furry and it has pointy little ears.
Talia: That's a Shifu!
Amber: What's a Shee-Poo?
:) Have you seen Kung Fu Panda?
Judge for yourself...
Blogging Tips (How to cross words out)

Jenn asked, "how do you change your font so you can stroke out words?"

Click over to the "Edit Html" Tab
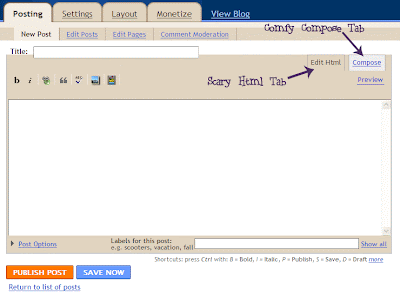
And enter the following html:
<strike>words you want crossed out</strike>
When you preview it, you should see this:
If you try this & it works, comment & let me know the tutorial was helpful!
If you're confused or have more questions, please comment!
Fabric Flowers
I posted a while ago about a ruffle butt onesie that I made. I decided to decorate the front of it a little and used a tutorial over at the idea room.

Here's where I put it on the onesie:

And how I decided to package it for my cute little niece:

While I was looking for ideas for decorating the front of the onesie, I found these ideas:
Make a letter on the onesie (also used flowers)
Another super cute onesie
And another idea for the flowers might be to do a fabric version of these paper magnets
The flowers are quite simple to make, so have fun trying them out! :)
~This post has been shared with others at a link party~.

Here's where I put it on the onesie:

And how I decided to package it for my cute little niece:

While I was looking for ideas for decorating the front of the onesie, I found these ideas:
Make a letter on the onesie (also used flowers)
Another super cute onesie
And another idea for the flowers might be to do a fabric version of these paper magnets
The flowers are quite simple to make, so have fun trying them out! :)
Email Notifications
Subscribe to Heather Lynne ~ Raising Memories by Email
There is also a form at the bottom of the blog that you can always use, to sign up for e-mails.
Baby Quilt
It's finally time for me to share a picture with you of my first creation on my sewing machine! I loved it & was so happy to give it to my Sister In Law at her baby's shower.
Here's how I wrapped it up:

And here it is!


Here's how I wrapped it up:

And here it is!

Ragdoll
Have you heard of Black Apple Dolls? This great woman named Emily has an Etsy shop called The Black Apple and once went on the Martha Stewart show and shared a template for one of her dolls.
My friend Cheryl told me about it a while ago and I've been wanting to make one ever since! I finally did it last week, and I'm happy with the result :)
 This one is Katrina's. I altered the pattern a bit, to give her dress a bit of flare, and gave her pigtails because I wanted her to have long hair. I made her smaller than she was "supposed to be" by accident, but I like it that Katrina has a tiny little baby. I bought some other fabric to make one for Talia and I plan to make hers a bit bigger.
 This one is Katrina's. I altered the pattern a bit, to give her dress a bit of flare, and gave her pigtails because I wanted her to have long hair. I made her smaller than she was "supposed to be" by accident, but I like it that Katrina has a tiny little baby. I bought some other fabric to make one for Talia and I plan to make hers a bit bigger.

Vote! :)
There is a local photographer who I am a fan of who did our family photos last year (I have mentioned her several times before). Here name is Amanda Stratton, and she's holding a photo contest right now, with the subject of "Rain".
Check out my entry in her contest and if you like it, vote for the 4th photo down (called "Puddle Jumping" by Heather)! :) Thanks for taking a look & while you're at it, check out the rest of her blog!

Check out my entry in her contest and if you like it, vote for the 4th photo down (called "Puddle Jumping" by Heather)! :) Thanks for taking a look & while you're at it, check out the rest of her blog!
Terrah's Parts Poster
This is my adorable new niece's parts poster:

I love designing these posters! Baby Terrah was just 6 days old when I took these photos- isn't she pure precious? :)
I love designing these posters! Baby Terrah was just 6 days old when I took these photos- isn't she pure precious? :)
Subscribe to:
Posts (Atom)