March 2010
  

Easter Egg Reading Hunt

I got the idea for an Easter Egg Reading Hunt from Chasing Cheerios. Yesterday I finally put it into action. I added rules to ours because I knew Talia would get bored if I didn't ;)


So, she found an egg, and had to read the word before she could look for the next one (and to keep her interested I told her there was a surprise after she found all the eggs). It didn't take much- she was excitedly searching for eggs & laughing at where she would find them.

At the end she got a yellow peep marshmallow. She looked at me after I placed it in her hand and said, seriously, "Mommy. This is junkfood!" (as though she were disappointed in me)... what's the world coming to??

abc button

General Conference Ideas

In my church, we have a General Conference twice a year. It's coming up this weekend, so we'll be listening online and attending our church building for the different sessions over the weekend.

It's a great opportunity to hear our church leaders speak, but it's a bit tricky to keep young kids interested during it!

I did some searching online & found some great, free resources for keeping kids entertained/busy/interested during conference.


First, a General Conference Notebook right from the church website. It has pictures of each of church leaders and spots to write about what they spoke about. It also has questions to answer. (This is a bit advanced for my kids)

They also have some online Conference Games that your kids can play in preparation for conference.

Check out Sugar Doodle for a cute General Conference Packet that you can print. She's also got colouring pages and other activities for ages from Junior Primary up to Youth.

There's another General Conference Activity Packet from a blogger who calls her blog, Magnify or Simplify. There are a ton of great and different activities in this one!

If you've found other resources, please share them in the comments!

Absent

I've not posted as much as usual lately because we've been pretty busy around here this weekend. The posts are coming though :)

In the meantime, you may notice that some images are not showing up on the blog. As far as I can determine, this is a Blogger/Picasa issue (according to the Blogger Status Page, "Our image backend is experiencing problems which may affect the display and/or uploading of photos. We are working to resolve this and will update this post when we have more information").

Talia's 4th Birthday Party (A Mess of Balloons)


It's been a couple of months since Talia's birthday & I'm finally blogging about her party! Someone asked me how I was going to top her 3-Year Old party (A Fairy Princess Tea Party), and I wondered the same thing- I loved that party! I didn't have to come up with an idea this year though, because after blowing up balloons for other birthdays before hers, Talia requested "a mess of balloons" for her birthday party. So, a mess of balloons, we set out to create!


I had visions of filling the living room with balloons to the extent almost of a ball pit, but it didn't end up that full (and a lot of balloons popped in the night before the party!) I think our little birthday girl was happy anyway ;)

Here's the party table set up with a balloon centerpiece:


Here's what the lunch table looked like:


They made their own party hats, name tags, and bracelets (I found a set of foam kits at the dollar store for this!)

We had balloon games (led by Daddy), but they definitely seemed to enjoy balloon freeplay the most ;)

We also had punching balloons, and balloon animals (also made by Daddy)

Lunch included heart shaped sandwiches and wouldn't be complete without pink milk!

Table Setting Placemat


I've been thinking about making table setting placemats for Talia for a long time and I finally did it. I'm happy with how it turned out & look forward to showing her how to "properly" set the table. :)

(Right now when she helps set the table, we get some very "creative" arrangements! ;)

Here's What I Did:

1. Trim background paper to size needed for my laminator
2. Trace dishes & cut out of white cardstock
3. Glue paper dish outlines in place so they won't move while laminating
4. Laminate & Voila! :)

5 Minute Chocolate Cake


There is a great video tutorial over at Instructables, for 5-minute Chocolate Cake.. When my sister in law told me about it, I had to try it! :)

I didn't take pictures for a tutorial because Instructables totally took care of that. But here is a little explanation of what we did.

How To Do It:

1. Gather ingredients
2. Grab a mug
3. Get out your tablespoons!

4. Dump all the tablespoons of ingredients into the mug.
5. Stir

6. Nuke it

7. Let them eat cake! :)
8. Clean out your microwave ;)

So fun, so easy! (Follow the link at the top for the 5-minute chocolate cake tutorial if you want to give it a try! :)

Monday Moments #11


The other day we went for a walk & Talia helped Katrina put her shoes on.
---------------

This morning Talia looked up at me for a long time (out of nowhere) with a smile on her face, and then narrated, "gazing into your blue eyes..." lol!

---------------

We were reading our Book of Mormon reader today before Talia's nap. We read the story about Captain Moroni and how Zarahemna got scalped. There's a picture of the Nephite holding his sword up with the scalp on it & Zarahemna's long braid attached to it. Talia happily pointed out that a nice, good boy could have his hair now! (Haha, Nephite Angel Hair for Kids? :)

--------------

From the time Talia was pretty little, I have called her, affectionately, my scrumptious munchkin. Last night as I was putting her to bed she said, "I love you scrumpsh... sometimes when you love people you just call them scrumpsh."

--------------

Also, of her friend Amelia, she said (again, out of nowhere, sitting at the kitchen table at dinner time), "I love Amelia more than an animal loves their child." (Where does she come up with these things?!)

200th Post (Favourites)

Well isn't this exciting- a blogging milestone!

I didn't notice that I was about to hit 200 posts in time to plan anything too fantastic, so for today's post, I'm just going to share with you some of my favourite posts on the blog, and some of the most popular posts since combining my two blogs into one.

So, in no particular order, here are 10 of our favourite posts:

1. Before & Afters with Photoshop (if you're interested in my offer from that post, I haven't chosen a picture yet, so feel free to send one in!) And here are a few more edits, in the post about some of Sierra's Photos.


2. Painting Popcorn to Eat!


3. Angel Hair for Kids (combined with the beginning of that story of how she cut her hair)


4. Jenn's guest post, An Organized Toy System


5. Fragrant Paper Hand Flowers in the snow! :)


6. Homemade Advent Calendar


7. Favourite Photos Contest


8. The Pink Load


9. My Maternity Photos


10. Stuffed Snowman


It's tempting to choose 20 posts... that's 1 in 10. But since I don't have the ability to see which posts are the most popular too far back in the blog (before the merge), and since I'm hesitant to bore you by making the list too long, we'll keep it at 10.

Besides if I did 20, then I might have to do 30 when the 300th post came along, and I don't think that would go over too well! ;)

-----------------

Thanks everyone for reading my blog. It's been a fun place for me to share my photography, keep motivated about doing fun things with my girls so that I can share ideas with others, and to write some of my thoughts about my life (and I hope to do more of this in the future).

Thanks also for the comments that some of you leave- it's nice to know someone's reading & it's fun to connect with you!

Virtual Paper Doll Bunny

Check out "Dress-up Bunnyfur"!
It's like an online paper doll & it's a bunny so it's Easter-y! :)

Talia & I had some fun today & here's her favourite creation:

Play Kitchen

I had visions of creating my very own homemade play kitchen for the girls. I had seen pictures of fabulous creations by numerous DIY-Queens (and kings ;) out in the blogosphere. But in the end, I knew there was a very very slim chance that I would ever complete such a project before my girls were ready for their own real kitchens.

So, I resorted to kijiji. And we bought the Little Tikes "My First Kenmore Elite" Kitchen for a small fraction of the "new" price. And we surprised them with it, for no reason! It was so fun!

Here's Talia's reaction:

Talia, Katrina & I spent the next morning arranging dishes, setting pretend tables, feeding dolls, and having tea parties. It was great!


If you're interested in creating your own kitchen (I think you are amazing, btw), just google "homemade play kitchen"... seriously, click here & you'll get a glimpse of the impressive creations out there- they're awesome!

Happy St. Patrick's Day! (ish)


Happy St. Patrick's Day!

We'll be wearing green today, how about you?

We'll be starting our day with a green breakfast... or Lucky Charms, depending on how the morning goes ;)

How the morning went:
Talia threw up before I finished getting Katrina dressed, and didn't want any breakfast.

We've also got playgroup today.

Yesterday we made cards with 4 leaf clovers on them, made from green paper hearts. We already gave them out though, & I didn't take pictures :/
All you need are:
- 4 green paper hearts
- some glue
- a green pencil crayon/crayon/marker for the stem

Easy craft!

Good thing we did something St.Patrick's Day-ish yesterday. I think most of the day will be spent relaxing & watching movies... I don't think I'll be trying any green food on her just yet... we're focussing on fluids and maybe something simple later on!

Katrina's Parts Poster

I finally finished and ordered my own baby's parts poster today. (Now that she's over a year old). I'm really happy with it!

The quote at the bottom is taken from her song. My father in law writes a personalized song for each of his grandchidren when they're born- it's a tradition that I love!

Monday Moments #10


Talia was sick & asking about why people sometimes lose their voices when they're sick. I decided to go for it & explain about mucous. She said she didn't like the word "mucous" and wanted to change the name to "Newt". (She's watched Matilda recently, so I'm guessing that's where the name came from). I don't particularly like the sound of the word mucous either, Talia.

Last night Ken told me he should have a blog. If you know Ken, you know I never expected to hear those words come out of his mouth- but he was kidding, so it wasn't that surprising. Why did he feel a need to blog? Because he requested potato wedges for dinner & I said, "Do we have potato wedges somewhere?" In my defense, I was picturing frozen ones... do they have those? He just laughed and sai, "Uh, we have potatos... from which you can make potato wedges."


Remember this hair?

Word Cards


I made up some really simple word cards for Talia with a marker and some card stock.

She has just started really reading words and we're pretty excited!
[we practise sounding out the words, notcing similarities & rhyming words, etc.]

Blogging Tips (Changing Your Title & Date Fonts)

Okay, so today's tip is just going to point you in the direction of where to find some information.

If you've ever wondered how people change the font on their title or date or sidebar titles (beyond the basic blogger options), look no further than kevinandamanda.com! They have a great tutorial on "How To Use A Cute Font For Your Blogger Post Titles".

You can find lots of fun fonts there as well!

Now, go, check them out! :)

(And if you have any ideas/requests for future blog tips posts or photoshop tips posts, post them in the comments here!)

Spring Walk

I dug out a pair of Talia's old shoes for Katrina to wear outside and tried a jacket on her for size.
Talia got her jacket & runners on.
I put my coat on and then took it off.
And we set out for a walk to get the mail.

The look of pure joy on Katrina's face at being allowed to go outside and walk free was adorable.

Talia ran ahead on the sidewalk with excitement.

I held two little hands.

One eager, steady, ready to let go and run free but willing to return again.

The other also eager, but stumbling nearby, accepting her need for my hand.

Oh, I love these girls. I love Spring. And I hurt a little inside, knowing that there will never be another springtime like this one in my lifetime.


It was lovely!

Mini Banner for Mail

We made a mini banner to send to my brother who is serving a mission for our church, in California.


This idea came from giverslog (a cool blog that has all kinds of homemade gift ideas and has a side focus on finding lightweight things to mail- she once mailed a frisbee (with no packaging).. cool eh? :)

Oh, and Valerie over at Frugal Family Fun Blog is doing a great giveaway on her blog right now! I love her blog, so even if you aren't thinking about the giveaway, you ought to check her blog out!

Mixing Colours and Melting Ice Cubes

This was a great activity because it touched on science, math, colours, patience, colouring in the lines... and it was totally fun!

How To Do It:

1. Add a drop of food colouring to the water in each ice cube, before freezing. (Talia loved getting to add drops of food colouring by herself)

2. Make a paper with math equations for different colour combinations, leaving an empty spot for the answer. (We took this opportunity to talk about what the "+" and "=" signs mean)

3. The next day, fill glasses with ice cubes in different colour combinations & watch to see what colours they make when they melt! (This was fun but took a while, so we added leftover cubes to cups of water for more food colouring fun while we waited)

4. Let your child colour in the answers when it's all finished.

I got this idea from a blog, but I can't remember where now!

Green Breakfast


This photo is from another year, but I found it recently in our family photos on the computer & thought it was a fun idea that I could share on this blog. Have fun making March special with green food colouring! :)

Monday Moments #9 (Back in Time)

I was just looking back in my journal for something & found something cute that Talia did (this was November, 2008). Here's what I wrote:

As I was putting her back to sleep, I kissed her on the forehead & then I gave her a bunch more quick kisses around her face & said, "Oh! My lips got carried away!" She looked amused, so I did it again, & she said, "Did your lips get carried away again?" I said yes & she said, "Here, I'll give them back to you!" & pretended to pick them up off of her face & put them back! lol What a cutie! :)

Still looking through my journal, & found this:

This morning, Talia got into bed with Ken & I. She always tells us to stop sniffing (she sometimes says "snuffing") on her (she doesn't like being breathed on, but when you're laying facing one of us, it's bound to happen ;)

So, this morning she was saying that & Ken said, "Talia, it's ok. Just suck it up." Talia proceded to take a quick sucking breath in ;) haha Then Ken said, "No Talia, suck it up means like... just deal with it." Talia then said, "Ok, it's a deal." haha :)


Another one:

Yesterday I found something gross & brownish & hardened onto Talia's carpet in her room (ew- no idea what it was, but it wasn't poo). I asked her if she knew what it was & she looked at it & determined it was "poop". I asked her how it got there & she said, "Maybe an animal did it?" I said, "Really? How would an animal get in here?" Then she told me that it rang the doorbell and then came in and pooped! lol

Here's a picture from that time in her life:

Alphabet Movement Cards

Alphabet movement cards are a fun way to help your kids learn while being active!

Alphabet Movement Cards

I found these alphabet movement cards at The Home Teacher's Blog.

I just printed them, cut them with my scrapbooking paper cutter and then laminated them so that they won't get worn out. It's a free printout, so go get some for yourself if you like them!

We haven't used them too many times yet. The first time I tried to get Talia to play with them she was NOT interested. It wasn't until my parents came over & Talia had my mom doing the actions that she started to get more interested in them. Now she'll go all out if she's in the mood ;)

Blogging Tips (Positioning Photos in Your Post)

First let me just say that I am not a Blogger guru or anything of the sort. I am, however, having fun with blogging. I like to try new things with my own blog and I know some things from designing my own websites & such.

I shared a blogging tip a while ago on my blog because I had mentioned a Blogger feature to a friend who also blogs and she didn't know about it. It wasn't hard to use and it's sooo handy!! I thought if she didn't know about it, other people don't know about it, so I decided to share my little tidbit with my modest little readership ;)

Then my sister in law got a blog and started asking questions about how to do things with it. Seriously, within the last year or two, the number of people I know IRL (in real life) who have started blogging is huge. So, I begin a series of posts about blogging wherein I will share some little tips I have come across in my time of blogging.

Image and video hosting by TinyPic
(fancy little image, eh?.. did I mention my love for Photoshop?)


So, we begin the series with "How to position a photo in your Blogger post"...

(a good one for beginner bloggers or bloggers who are still trying to click & drag within the Compose window)

When you're typing your entry in blogger, you can type in "Edit Html" mode or in "Compose" mode. If you don't know much about html, you will likely choose "Compose" which is fine (most of the time).

However, when it comes to positioning photos, it's pretty annoying!!!


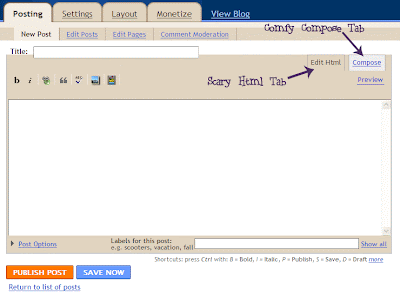
Luckily, it's easy to switch between "edit html" and "compose" tabs, and luckily I have a little something to share with you about html.

If you have a bunch of photos for one blog post, you will probably click on the "Add Image" icon and then browse for the photos on your computer, set your layout, and upload your images (because you've probably figured out that you can click on "Add another image" and upload multiple images at once).


The great thing about that is that blogger uploads all of your photos into your post for you and you can see them right there in the compose window. The annoying thing is that they all sit, one after the other, at the beginning of the entry and even though you can click & drag your photos around, it's really hard to do that within the tiny little compose window!


It would work to click & drag in the example shown above because my bottom photo and the spot where I want it are visible within the Compose window. But if I want to put my first photo there, I cant do it!

Here's The Solution:

1. Do everything you want with your entry in "Compose" view, including uploading your photos.
2. Then click on "Edit Html" to switch tabs.
3. You will then see something that looks like crazy gibberish code at the top, where your photos are, and you will need to resist the urge to run away in confusion and frustration (assuming you have not worked with html before). Resist the urge.


4. A small lesson in Html:
In html, when there is a link, it starts with <a href= and then it goes on and on until it ends with </a>
5. Since Blogger posts pictures as links (so that you can click on the picture and see it at its original size), you want to look for the section of code that begins with <a href= and ends with </a> (that section is highlighted in the above image- you can click on it to see it larger if you need to)
6. Highlight the first section of code that looks like that. Copy it (by pressing ctrl + c) and then paste it (by pressing ctrl + v) in the place that you want the first photo to show up in your blog entry.
7. Repeat step 6 for each of your photos.
(If you get confused about which photo is where, just click back over to the "Compose" tab and figure it out).
8. Be sure to delete the code at the top of the entry after you've pasted it where you want it (or you'll have each photo repeated at the start of your entry)

I hope I've explained this clearly. It's a really easy thing to do once you understand that little bit about the html code- it just takes a little getting used to!

Please let me know in the comments whether this tutorial made sense or was useful to you!
And if it didn't make sense or you still have questions, comment & let me know- I'll be happy to help if I know the answer!

Got something you'd like to learn about photography or blogging?
Tell me about it in the comments & if I can help, I'll post about it!

Contact Form

Name

Email *

Message *